
The Ultimate Checklist to Scan Slides to Digital in South Orange County (2026)
Approximately 85% of people are currently searching for a way to preserve their family photo collections. If you have a box of vintage memories sitting in a South Orange County garage, you likely feel the urgency to scan slides to digital before the film fades. It's natural to worry about your irreplaceable originals being lost in the mail or damaged at a massive processing plant. You might also feel overwhelmed by technical jargon like bit-depth or 4000 DPI, making the conversion process feel like a daunting chore rather than a celebration of your history.
We believe your family legacy deserves the care of a trusted guardian. You should be able to enjoy high-resolution digital files without spending hundreds of hours on a DIY project. This article provides a complete 2026 checklist to help you navigate your local options. We will compare professional services in Irvine and Mission Viejo, explore free resources at the Tustin Library, and outline the exact technical steps needed to ensure your memories look better than ever. By the end, you'll have a clear plan to organize, preserve, and share your history with confidence.
Key Takeaways
- Understand how the local coastal climate accelerates film decay and why immediate preservation is essential for your family history.
- Compare the 40-hour DIY time investment against professional results to determine the best way to scan slides to digital for your needs.
- Learn how to identify film types like 126 or Super Slides and organize them by decade to streamline your conversion project.
- Navigate technical requirements with ease by learning the difference between archival TIFF files and sharing-ready JPEGs.
- Discover the peace of mind that comes with local hand-delivery options in Mission Viejo and Laguna Woods to avoid shipping risks.
Why You Should Scan Slides to Digital Now: The Preservation Checklist
Slide scanning is a precise technical process. It involves converting analog transparency film into high-bit digital data to ensure every detail is preserved. To understand the necessity of this work, it helps to learn how image scanners work. Professional equipment uses specialized sensors to capture light as it passes through the film, turning physical layers of chemicals into permanent digital files. This isn't just a copy; it's a digital rebirth for your history.
In South Orange County, our coastal environment is a primary reason to scan slides to digital sooner rather than later. High humidity and salt air act as catalysts for chemical degradation. If your memories are stored in a garage in San Juan Capistrano or a closet in Laguna Niguel, they are currently under threat from the "Time Factor." Waiting even a few years can result in irreversible damage to the film's delicate emulsion layers.
Digitizing also addresses the "Space Factor." Vintage carousels and projectors are bulky and difficult to store. One small external drive can hold thousands of images that used to take up several shelves. This move also provides the "Accessibility Factor." You no longer need to set up a screen in a dark room to see your past. Digital files move your history onto the cloud and social media, making it easy to share a specific moment with family members across the country instantly.
Signs Your Slides Are Deteriorating
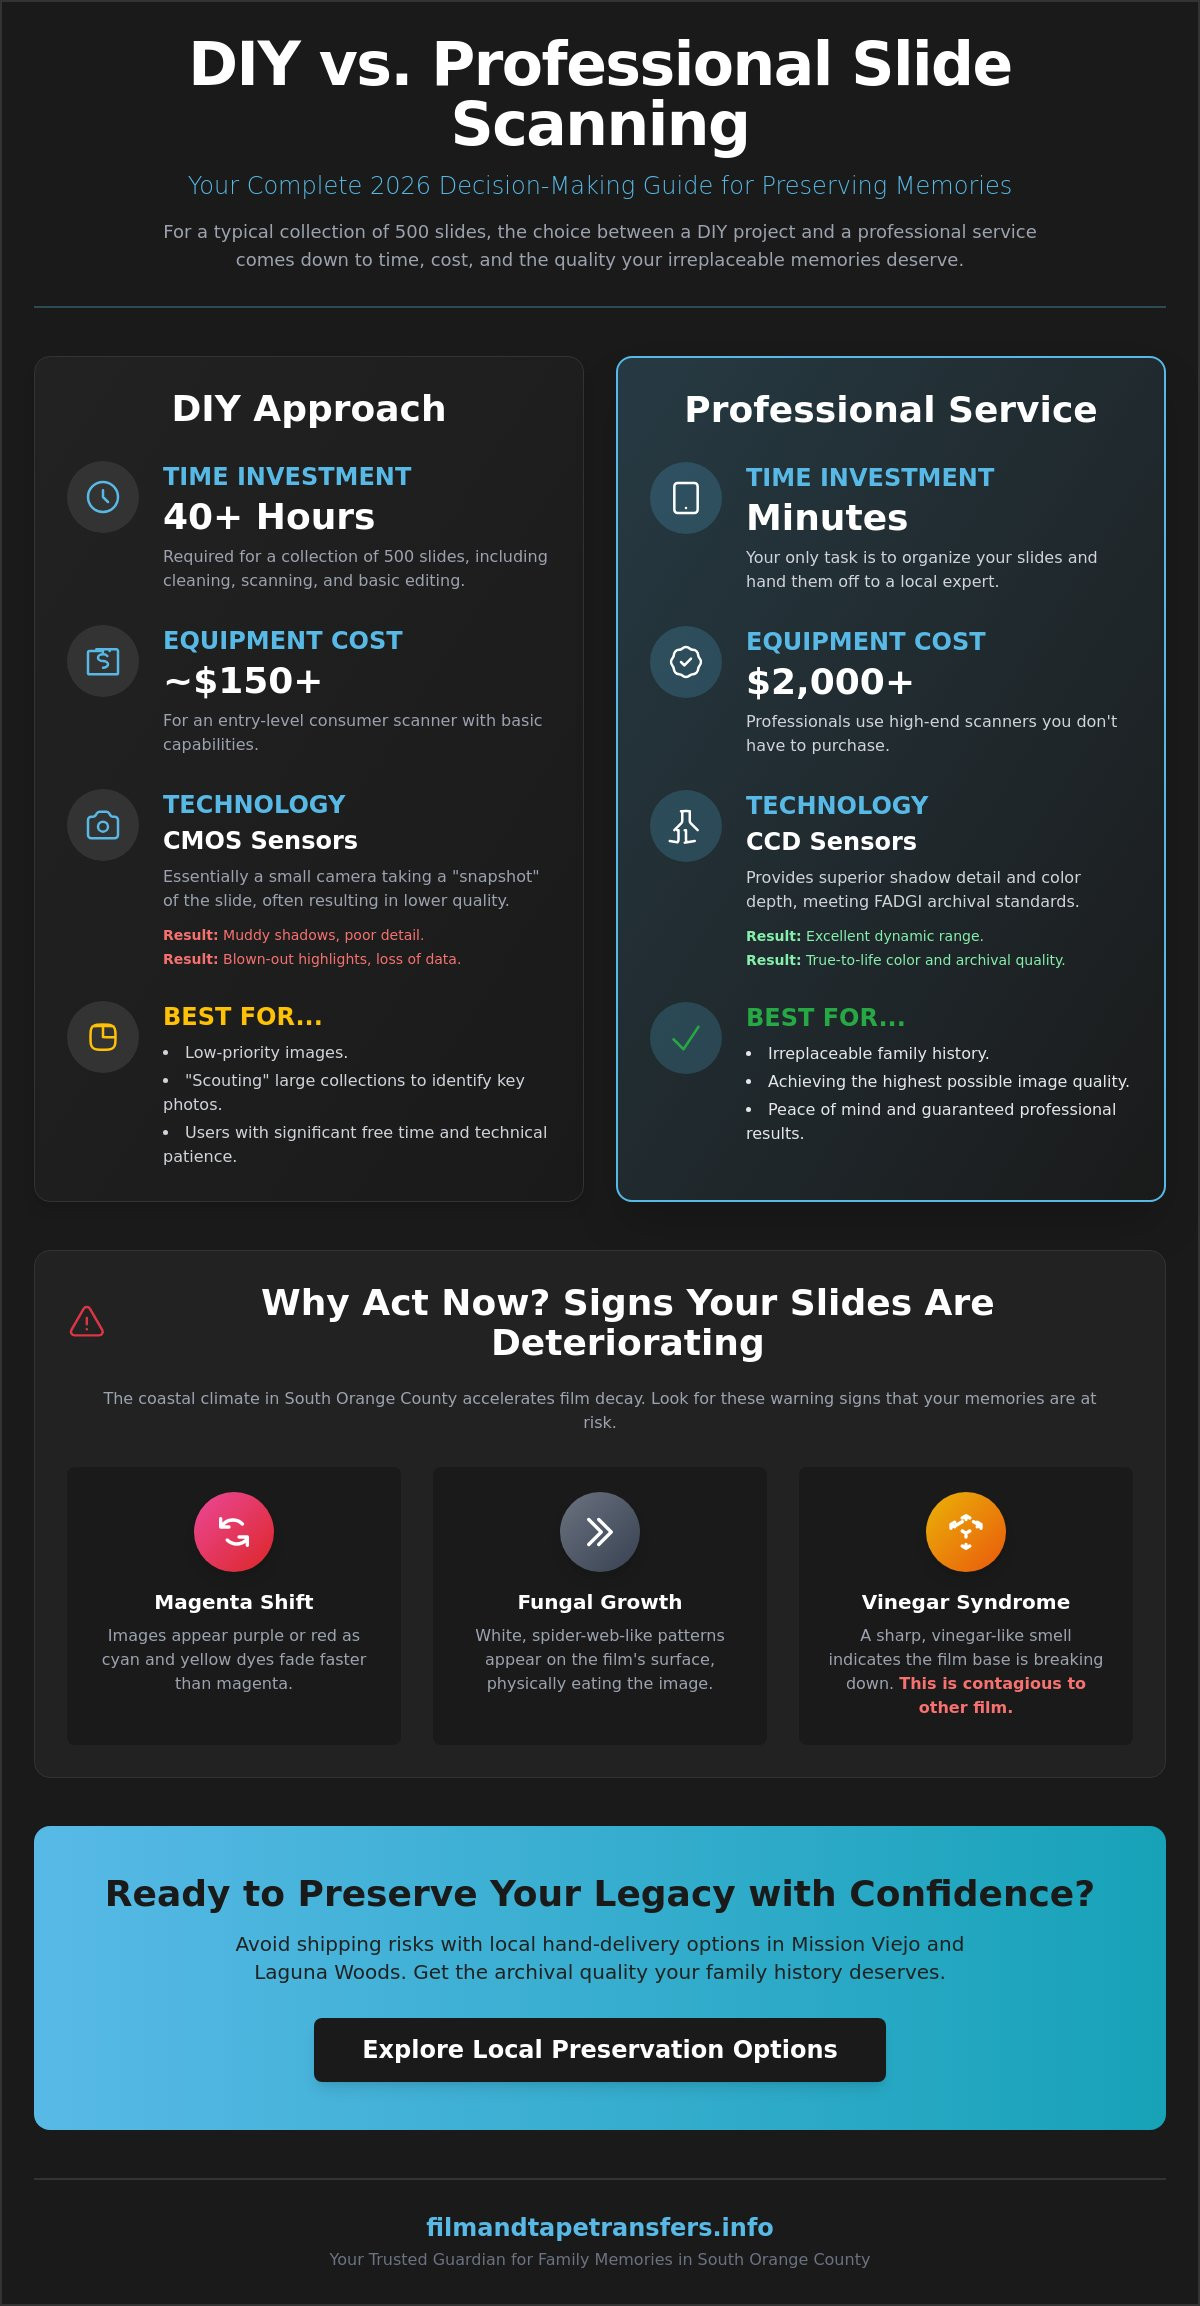
Examine your slides for a "magenta shift." This happens when certain dyes fade faster than others, causing images to look purple or red. Look closely for white, spider-web patterns on the surface. This is fungal growth that physically eats the image. You should also check for a sharp, vinegar-like smell. This is known as Vinegar Syndrome. It signals that the acetate base is breaking down, a process that eventually makes the film too brittle to handle. Unlike simple fading, Vinegar Syndrome is a contagious chemical reaction that can spread to other slides in the same box.
The Benefits of Digital Archiving in 2026
Modern digital transfers offer more than just a safe copy. Current AI-enhanced tools can restore faded colors and remove dust with incredible precision. Once you have digital files, you can implement the 3-2-1 backup rule. This means keeping three copies of your data on two different types of media, with one copy stored off-site. This strategy protects your legacy against hardware failure or local disasters. Additionally, these files make it simple to design high-quality photo books for the next generation, ensuring that every family member has their own copy of the family story.
DIY vs. Professional Scanning: A Decision-Making Checklist
Deciding how to scan slides to digital often comes down to a choice between your time and the final image quality. For a typical collection of 500 slides, a DIY project usually requires 40 or more hours of focused manual labor. This estimate includes the time needed for cleaning, mounting, scanning, and basic post-processing. While entry-level consumer scanners are available for around $150, they often rely on CMOS sensors. These sensors are essentially small cameras that take a quick photo of the slide. They frequently struggle with dynamic range, which leaves shadows looking muddy and highlights blown out.
Professional-grade scanners, which often cost $2,000 or more, utilize CCD (Charge-Coupled Device) sensors. These sensors provide superior shadow detail and color depth. They align more closely with FADGI technical guidelines, which set the standard for archival quality in federal institutions. Beyond the hardware, there's a steep learning curve. Mastering professional software like SilverFast or VueScan takes weeks of practice. You must understand how to manage histograms and color profiles to get the best results. If you want to ensure your collection is handled with expert care, you can explore local preservation options that use this high-end technology.
When DIY Makes Sense
DIY scanning is a practical choice for low-priority images. It's a good way to "scout" through thousands of slides to decide which ones are worth a high-resolution transfer later. This path requires a high tolerance for repetitive tasks and technical troubleshooting. It's also ideal if you already own a high-end flatbed scanner equipped with a transparency unit. However, be prepared for the significant time commitment involved in processing each individual frame manually.
When to Hire a Professional Slide Scanning Service
Professional services are essential for irreplaceable family history. If you're handling once-in-a-lifetime events like weddings or rare travel photos, the precision of a pro is necessary. Professionals use Digital ICE technology. This infrared-based system automatically detects and removes dust and scratches during the scan. It saves dozens of hours of manual retouching. A professional service is the best choice for bulk orders. They provide the consistency and color accuracy that consumer-grade hardware simply cannot match. This ensures your memories are preserved as high-bit digital data that will last for generations.
Pre-Scanning Checklist: How to Prepare Your 35mm Slides
Organizing your collection is the most effective way to streamline the process when you scan slides to digital. Grouping your slides by decade or specific event ensures that your digital folders will reflect your family's timeline accurately. For example, a box labeled "1978 Dana Point Harbor" is much more valuable than a generic pile of images. This step often saves money because it prevents the scanning of duplicates or unwanted shots that were never culled. High-quality organization leads to a more meaningful digital archive.
You should also inspect the physical condition of your media. Many slides remain stored in round carousels or plastic sleeves from the 1970s. Over time, these sleeves can become "sticky" due to plasticizer migration. This chemical process can bond the plastic to the film emulsion, causing permanent damage. Carefully remove slides from damaged carousels or deteriorating containers before handing them over for service. If a slide feels stuck, don't force it. Professional technicians have specialized tools to safely extract film from old mounts.
Establish a clear labeling protocol for your project. Mark your physical boxes with sequential numbers and descriptive titles. This allows the technician to name your digital folders to match your boxes exactly. It creates a seamless transition from your physical storage to your computer screen, making it easy to find specific memories later. Using a simple index card inside each box can also help track the contents during the transfer process.
Safe Cleaning Techniques
Surface dust is the primary enemy of a clear digital image. Use a soft-bristled brush or a quick burst of canned air to remove loose particles from the film. Never use water, glass cleaner, or household chemicals on the film emulsion. These substances can cause permanent staining or strip away the image layers. Always handle slides by the plastic or cardboard edges. Fingerprint oils contain natural acids that can etch into the film surface over time, leaving permanent marks that even digital tools can't fully remove.
Identifying Your Film Formats
Not all slides are the same size, and identifying them correctly helps ensure proper equipment calibration. The standard 35mm slide features a 2x2 inch mount with a rectangular image area. If you find square images in the same 2x2 inch mount, you likely have 126 format film. This was a staple for Kodak Instamatic cameras throughout the 1960s. Super Slides also use the 2x2 mount but feature a much larger square image area. Finally, 110 format slides are much smaller, often requiring specialized high-resolution scanning to capture sufficient detail from the tiny film frame.
The Technical Quality Checklist: What to Demand from Your Files
Technical specifications determine whether your digital files are simple snapshots or true archival masters. When you scan slides to digital, the resolution you choose dictates the level of detail captured from the original film. A resolution of 2000 DPI is the bare minimum for digital viewing; however, 4000 DPI is the industry standard for archival preservation. Higher resolution allows you to print enlargements up to 11x17 inches without seeing pixelation. It captures the fine grain of the film, ensuring that the digital version is a faithful representation of the physical slide.
File formats are equally important for your long-term storage strategy. JPEGs are highly compressed files, making them ideal for social media sharing and email. For your master archive, you should demand TIFF files. TIFF is a lossless format, meaning no data is discarded when the file is saved. You should also consider color depth. While 24-bit color is standard, 48-bit color captures billions more color variations. This extra data is vital if you plan to do any professional photo editing or color correction in the future. If you want to ensure your collection meets these high-bit standards, you can view our professional slide scanning services.
Post-processing is the final step in a quality transfer. Every slide requires manual cropping to remove the edges of the mount and orientation correction to ensure the image is right-side up. Generic software often fails to recognize vertical vs. horizontal shots. A human technician must inspect every frame to ensure the composition is correct and the final file is ready for viewing.
Understanding DPI and Megapixels
Scanning resolution is often confused with camera megapixels. A 35mm slide scanned at 4000 DPI yields approximately an 18-20MP image. Many consumer devices advertise "interpolated" resolution, which is a marketing trick that uses software to guess where pixels should be. This process creates a larger file size without adding any real detail. Optical resolution is the only true measure of scanner quality. It represents the physical capability of the scanner's sensor to see the actual detail present on the film.
Color Restoration and Dust Removal
Old slides often carry a layer of microscopic dust. Professional scanners use infrared light, often called Digital ICE, to find dust and scratches that the naked eye misses. This technology creates a separate map of the defects and removes them without blurring the image. Manual color balancing is also necessary because different film stocks age differently. Kodachrome slides often require different settings than Ektachrome to maintain natural skin tones. "Auto-Fix" buttons in basic apps often destroy subtle highlight details by blowing out the brightest parts of the image to make it look "vibrant."
The Local Advantage: Why South Orange County Trusts Local Pros
Choosing a local partner is the final piece of the preservation puzzle. When you scan slides to digital, the safety of your originals is just as important as the resolution of the final files. Most national transfer companies rely on a "ship-and-pray" model. They require you to place your family history in a cardboard box and send it to a massive processing plant across the country. While shipping carriers are generally reliable, even a small percentage of lost packages is unacceptable for irreplaceable media. Our "No-Ship" policy eliminates this anxiety entirely. Your slides never leave the safety of our local facility.
Residents in Laguna Woods and Mission Viejo appreciate the convenience of hand-delivery. This face-to-face interaction allows you to ask specific questions and receive immediate answers. You can discuss your 35mm slides to digital project directly with the technician who will perform the work. This direct line of communication ensures that your specific preferences for color balancing and folder organization are followed precisely. Supporting local experts in Aliso Viejo and Irvine means your memories receive superior archival care from people who understand their historical value.
Local Service vs. Mail-In Factories
Large national brands often use a "factory" approach to digitization. They focus on high volume and automated processes that can overlook subtle film defects. This can lead to missed details or generic color correction that doesn't fit the specific age of your film stock. A local specialist offers boutique care. We take the time to inspect every frame manually. For residents in Laguna Hills and San Clemente, the ability to see a sample scan before the full project begins is a major benefit. It allows you to confirm that the technical quality meets your expectations before we process the entire collection.
Final Steps: Your Digital Delivery
The final delivery of your files should be as seamless as the scanning process itself. We offer several options including high-speed USB thumb drives, secure digital downloads, and archival discs. Once you receive your files, take the time to verify them on your home computer. Open the folders and check the image orientation and file naming to ensure they match your physical labels. It's best to confirm everything is perfect before you put your original slides into long-term storage. When you're ready to preserve your history with a trusted guardian, visit our slide scanning service page to get started.
Secure Your Family Legacy Today
Your family story is too valuable to leave to chance. The coastal humidity in South Orange County often leads to chemical decay and fungal growth on vintage film. Moving your collection from dusty carousels into a high-quality digital archive ensures these moments survive for the next generation. When you choose to scan slides to digital at archival resolutions like 4000 DPI, you transform fading film into permanent, high-definition memories.
Trusting a local expert means your originals stay right here in your community. We offer over 30 years of archival experience and hand-process every order in our South Orange County facility. There is no shipping required; you can simply drop off your collection locally for total peace of mind. Preserve your memories today with South Orange County’s trusted slide scanning experts. Your history is worth protecting, and it's never been easier to get started.
Frequently Asked Questions
Is it better to scan slides to JPEG or TIFF?
TIFF is the superior choice for archival master files because it's a lossless format that preserves every bit of image data. JPEGs are more convenient for daily use; however, they use compression that discards some information to reduce file size. We recommend creating a TIFF master for long-term preservation and using JPEGs for social media sharing or digital photo frames. This strategy ensures you have the highest quality version saved for future generations.
How much does it cost to scan slides to digital near me?
Professional rates in South Orange County generally range from $0.69 to $0.89 per slide as of May 2026. These prices typically include essential services like Digital ICE dust removal and basic exposure correction. Many local labs in Irvine and Mission Viejo require a $20 minimum order. For large family collections exceeding 500 slides, bulk discounts are often available to make the preservation process more affordable.
Can I scan my slides using a smartphone app?
Smartphone apps are helpful for quick previews but they lack the optical precision needed to scan slides to digital for archival purposes. These apps rely on your phone's camera and external lighting, which often creates glare and muddy shadow details. They cannot capture the 4000 DPI depth provided by a dedicated professional scanner. Use apps to sort your collection, but choose professional equipment for your final digital archive.
What is the best resolution for scanning 35mm slides?
A resolution of 4000 DPI is the archival standard for 35mm film. This setting yields an image of approximately 20 megapixels, which is sufficient for high-quality prints up to 11x17 inches. While 2000 DPI is acceptable for viewing on standard computer monitors, it doesn't capture the full detail of the original film grain. High-resolution scanning ensures your digital memories look sharp even on the advanced displays of the future.
How do I clean old slides before scanning them?
Use a specialized anti-static brush or a gentle burst of compressed air to remove loose surface dust. It's vital to avoid water or household cleaning chemicals, as these substances can permanently strip the film emulsion. If you find heavy fungal growth or sticky residue, it's best to let a professional technician handle the cleaning. Always hold slides by their cardboard or plastic mounts to prevent skin oils from etching into the film.
What happens if my slides are stuck in a projector carousel?
Professional technicians use specialized tools to safely extract slides from jammed or warped carousels. Do not try to force a stuck slide out of a tray, as this often results in torn film or a broken mount. Jammed carousels are a frequent issue with older plastic units that have been stored in warm Southern California attics. We handle these delicate extractions with care to ensure the film remains intact for the scanning process.
How long does it take to digitize a box of 100 slides?
A standard order of 100 slides typically takes 3 to 5 business days at a local boutique facility. This timeline allows for individual frame inspection, manual cropping, and precise color balancing. While mass-market factories might offer faster automated turnaround, they often skip the manual checks that ensure quality. Larger projects involving 1,000 or more slides usually require 2 to 3 weeks for complete processing and verification.
Can you restore the color of faded slides during the scanning process?
Yes, professional scanning workflows include manual color restoration to correct the magenta or blue shifts common in aging film. We adjust the color channels to bring back the natural skin tones and vibrant landscapes that have faded over the last 50 years. This level of restoration is much more effective than simple "auto-fix" buttons found in consumer apps. It preserves the authentic look of your memories while making them look as fresh as the day they were taken.